Create EXE or Setup File in .NET Windows Application
Visual Studio 2010 Setup and deployment Projects provides to make an exe or installer file in .NET windows application is easy and rapidly.
Visual Studio provides templates for four types of deployment projects: Merge Module Project, Setup Project, Web Setup Project, and Cab Project. In addition, a Setup wizard is provided to help step you through the process of creating deployment projects. You can see the snapshot which will help you to create EXE or Setup of yours window application.
Setup Projects :-
Setup projects allow you to create installers in order to distribute an application. The resulting Windows Installer (.msi) file contains the application, any dependent files, information about the application such as registry entries, and instructions for installation. When the .msi file is distributed and run on another computer, you can be assured that everything necessary for installation is included; if for any reason the installation fails (for example, the target computer does not have the required operating system version), the installation will be rolled back and the computer returned to its pre-installation state.
The following steps will give the elegant guidance to create an exe or installer file.
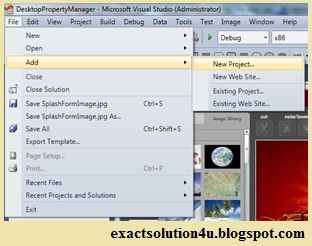
1, Go to file menu --> click Add --> new project -->now “Add New Project” dialog will appear.
2. Select the “Other Project Types” and click “Setup and Deployment” projects, Choose “Setup Project” give name project name in name text box finally click OK.
3. New project appear in solution explorer, for e.g., you have give the name “Setup” file will be displays with given name.
4. Right click the Setup > go View > click “File System”.
5. You can see the “File System on Target Machine” under three folders
Application Folder
User’s Desktop
User’s Program Menu
6. Select Application Folder and right click Add>Project Output>select Primary output.
7. Select User’s Desktop right click on the second window>click create new shortcut>select output file from Application folder>change the file name from primary output name to Setup.
Next: ----
Next: ----
8. Finally Build the new project After successfully Build the project Setup (Setup) will be appear in Application Debug or Release folder(depend upon the properties settings).
EXE or installer will be available on his physical path which is provided by you.
When you want to install the EXE on the client machine, you should be installed .NET Framework on that machine because, Applications and controls written for the .NET Framework requires the .NET Framework to be installed on the computer where the application or control runs.
"Thank you"